Hello crochet pal!

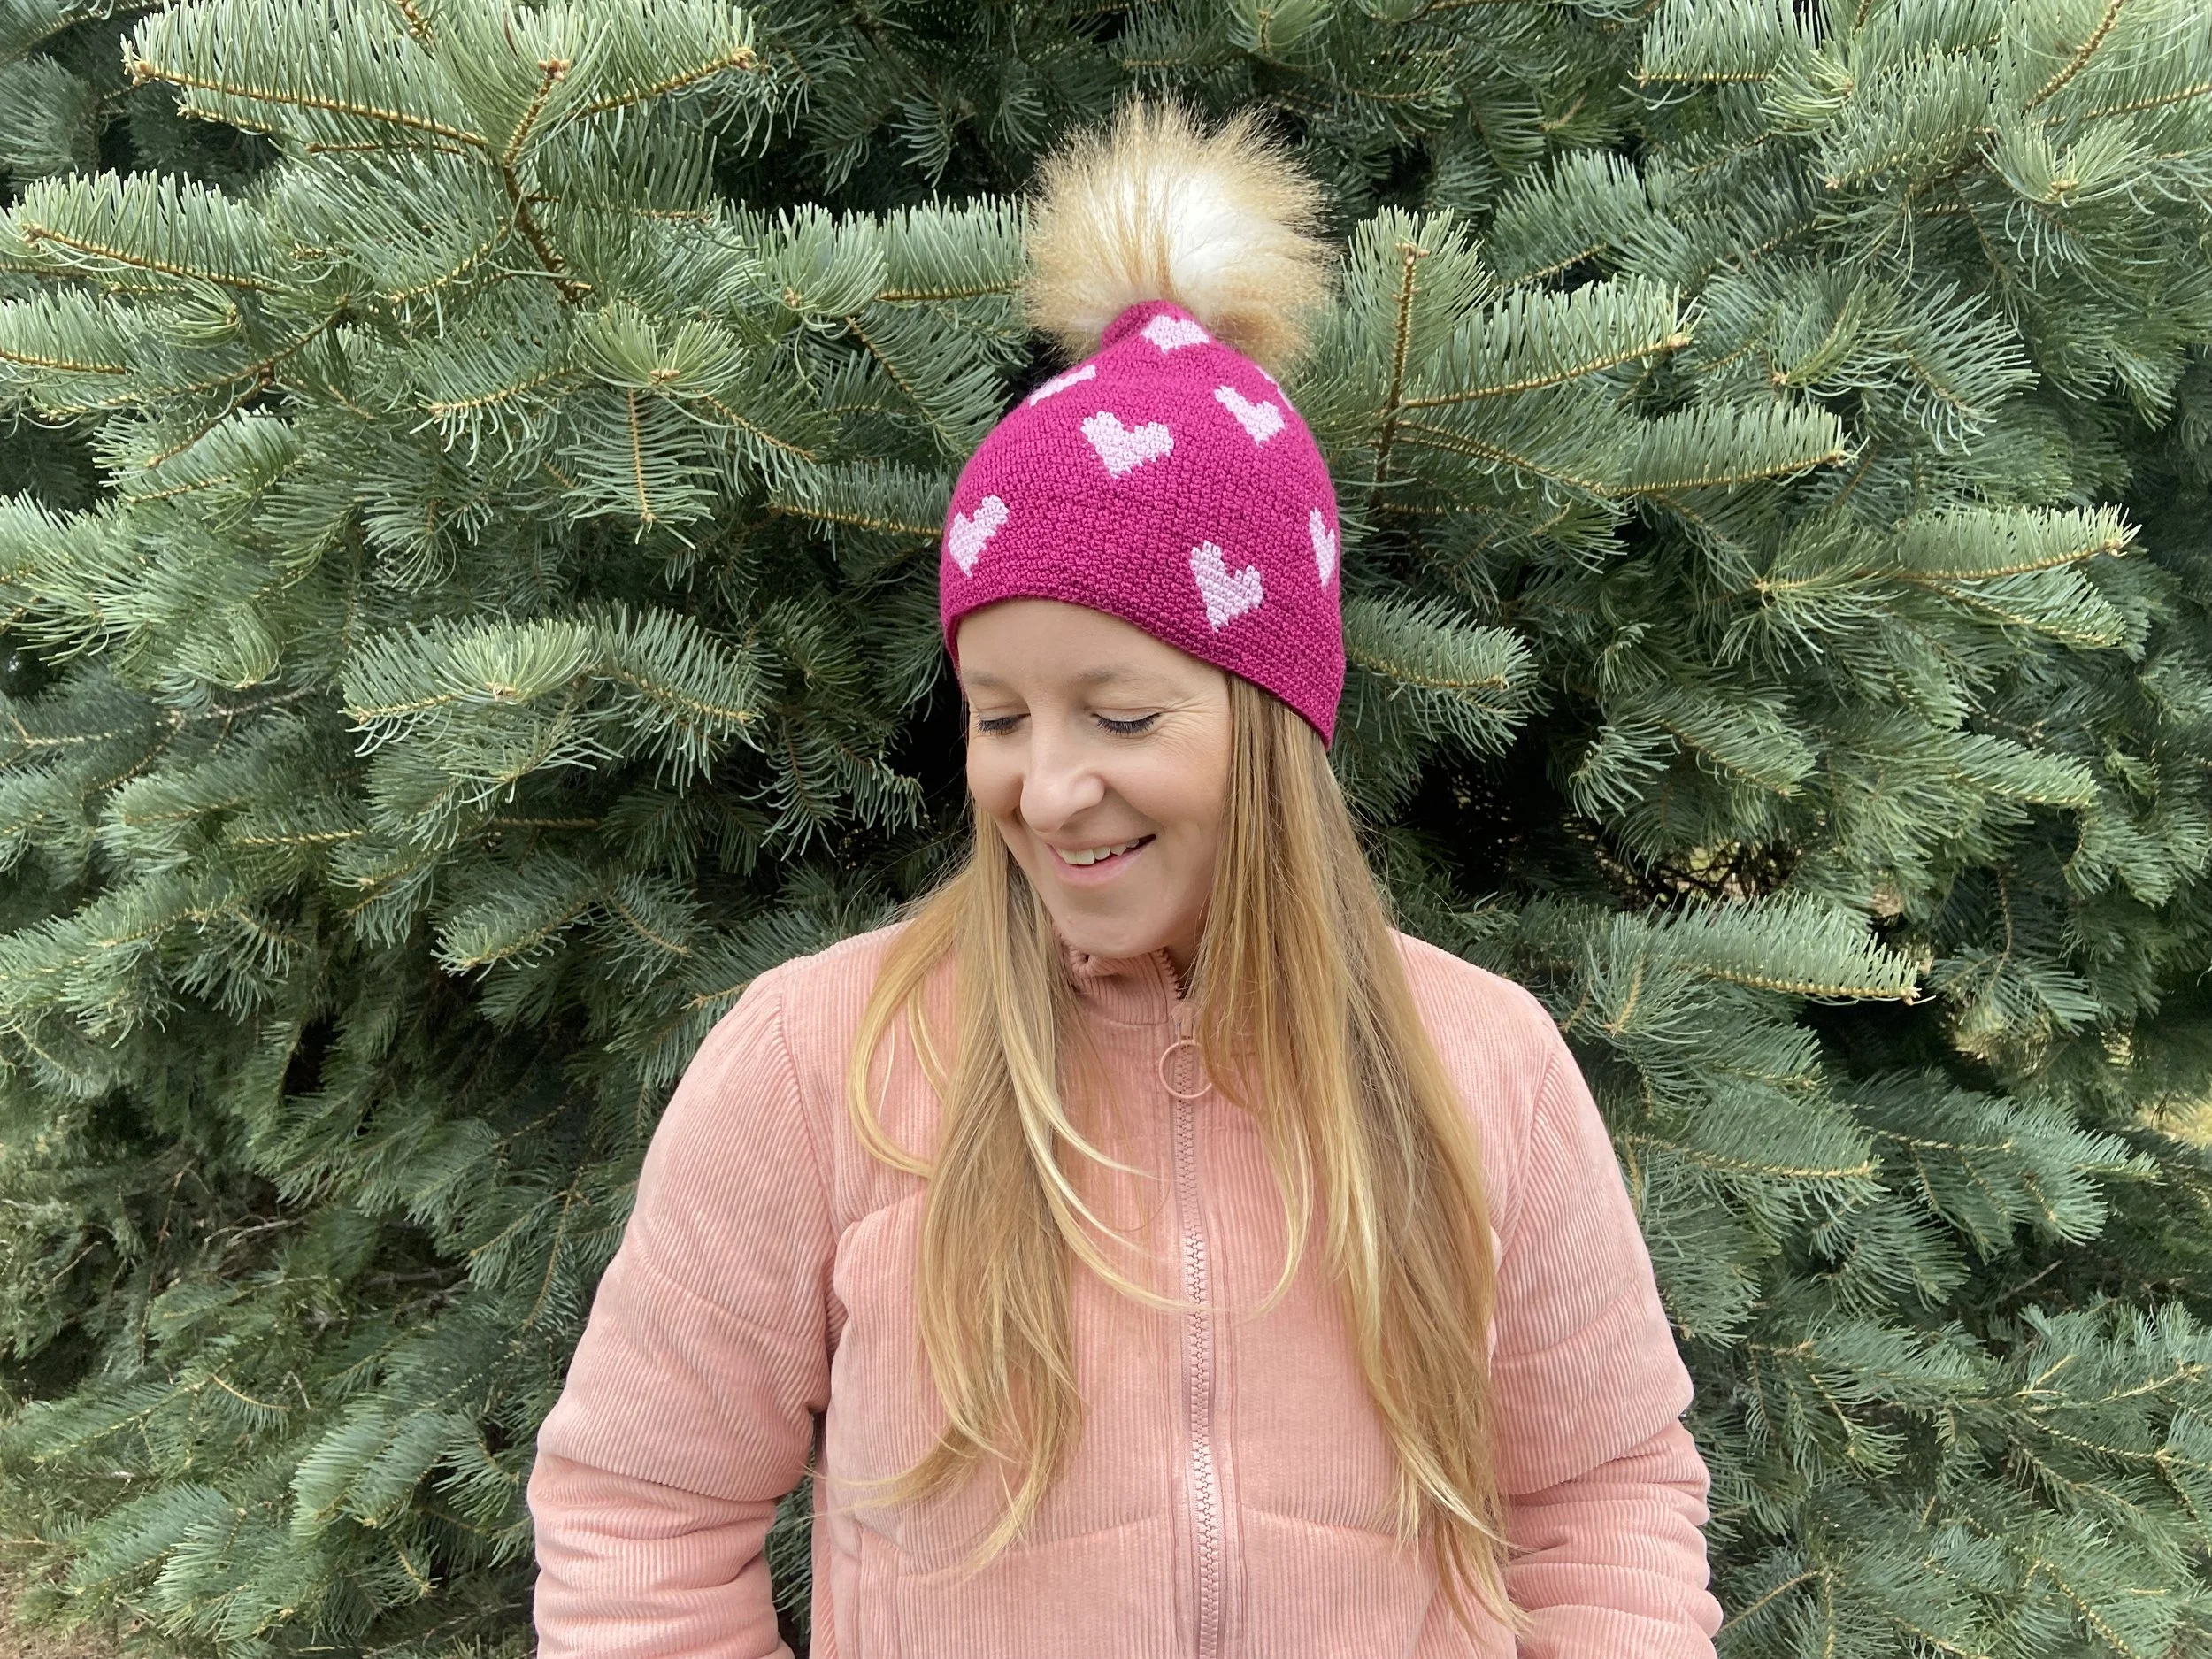
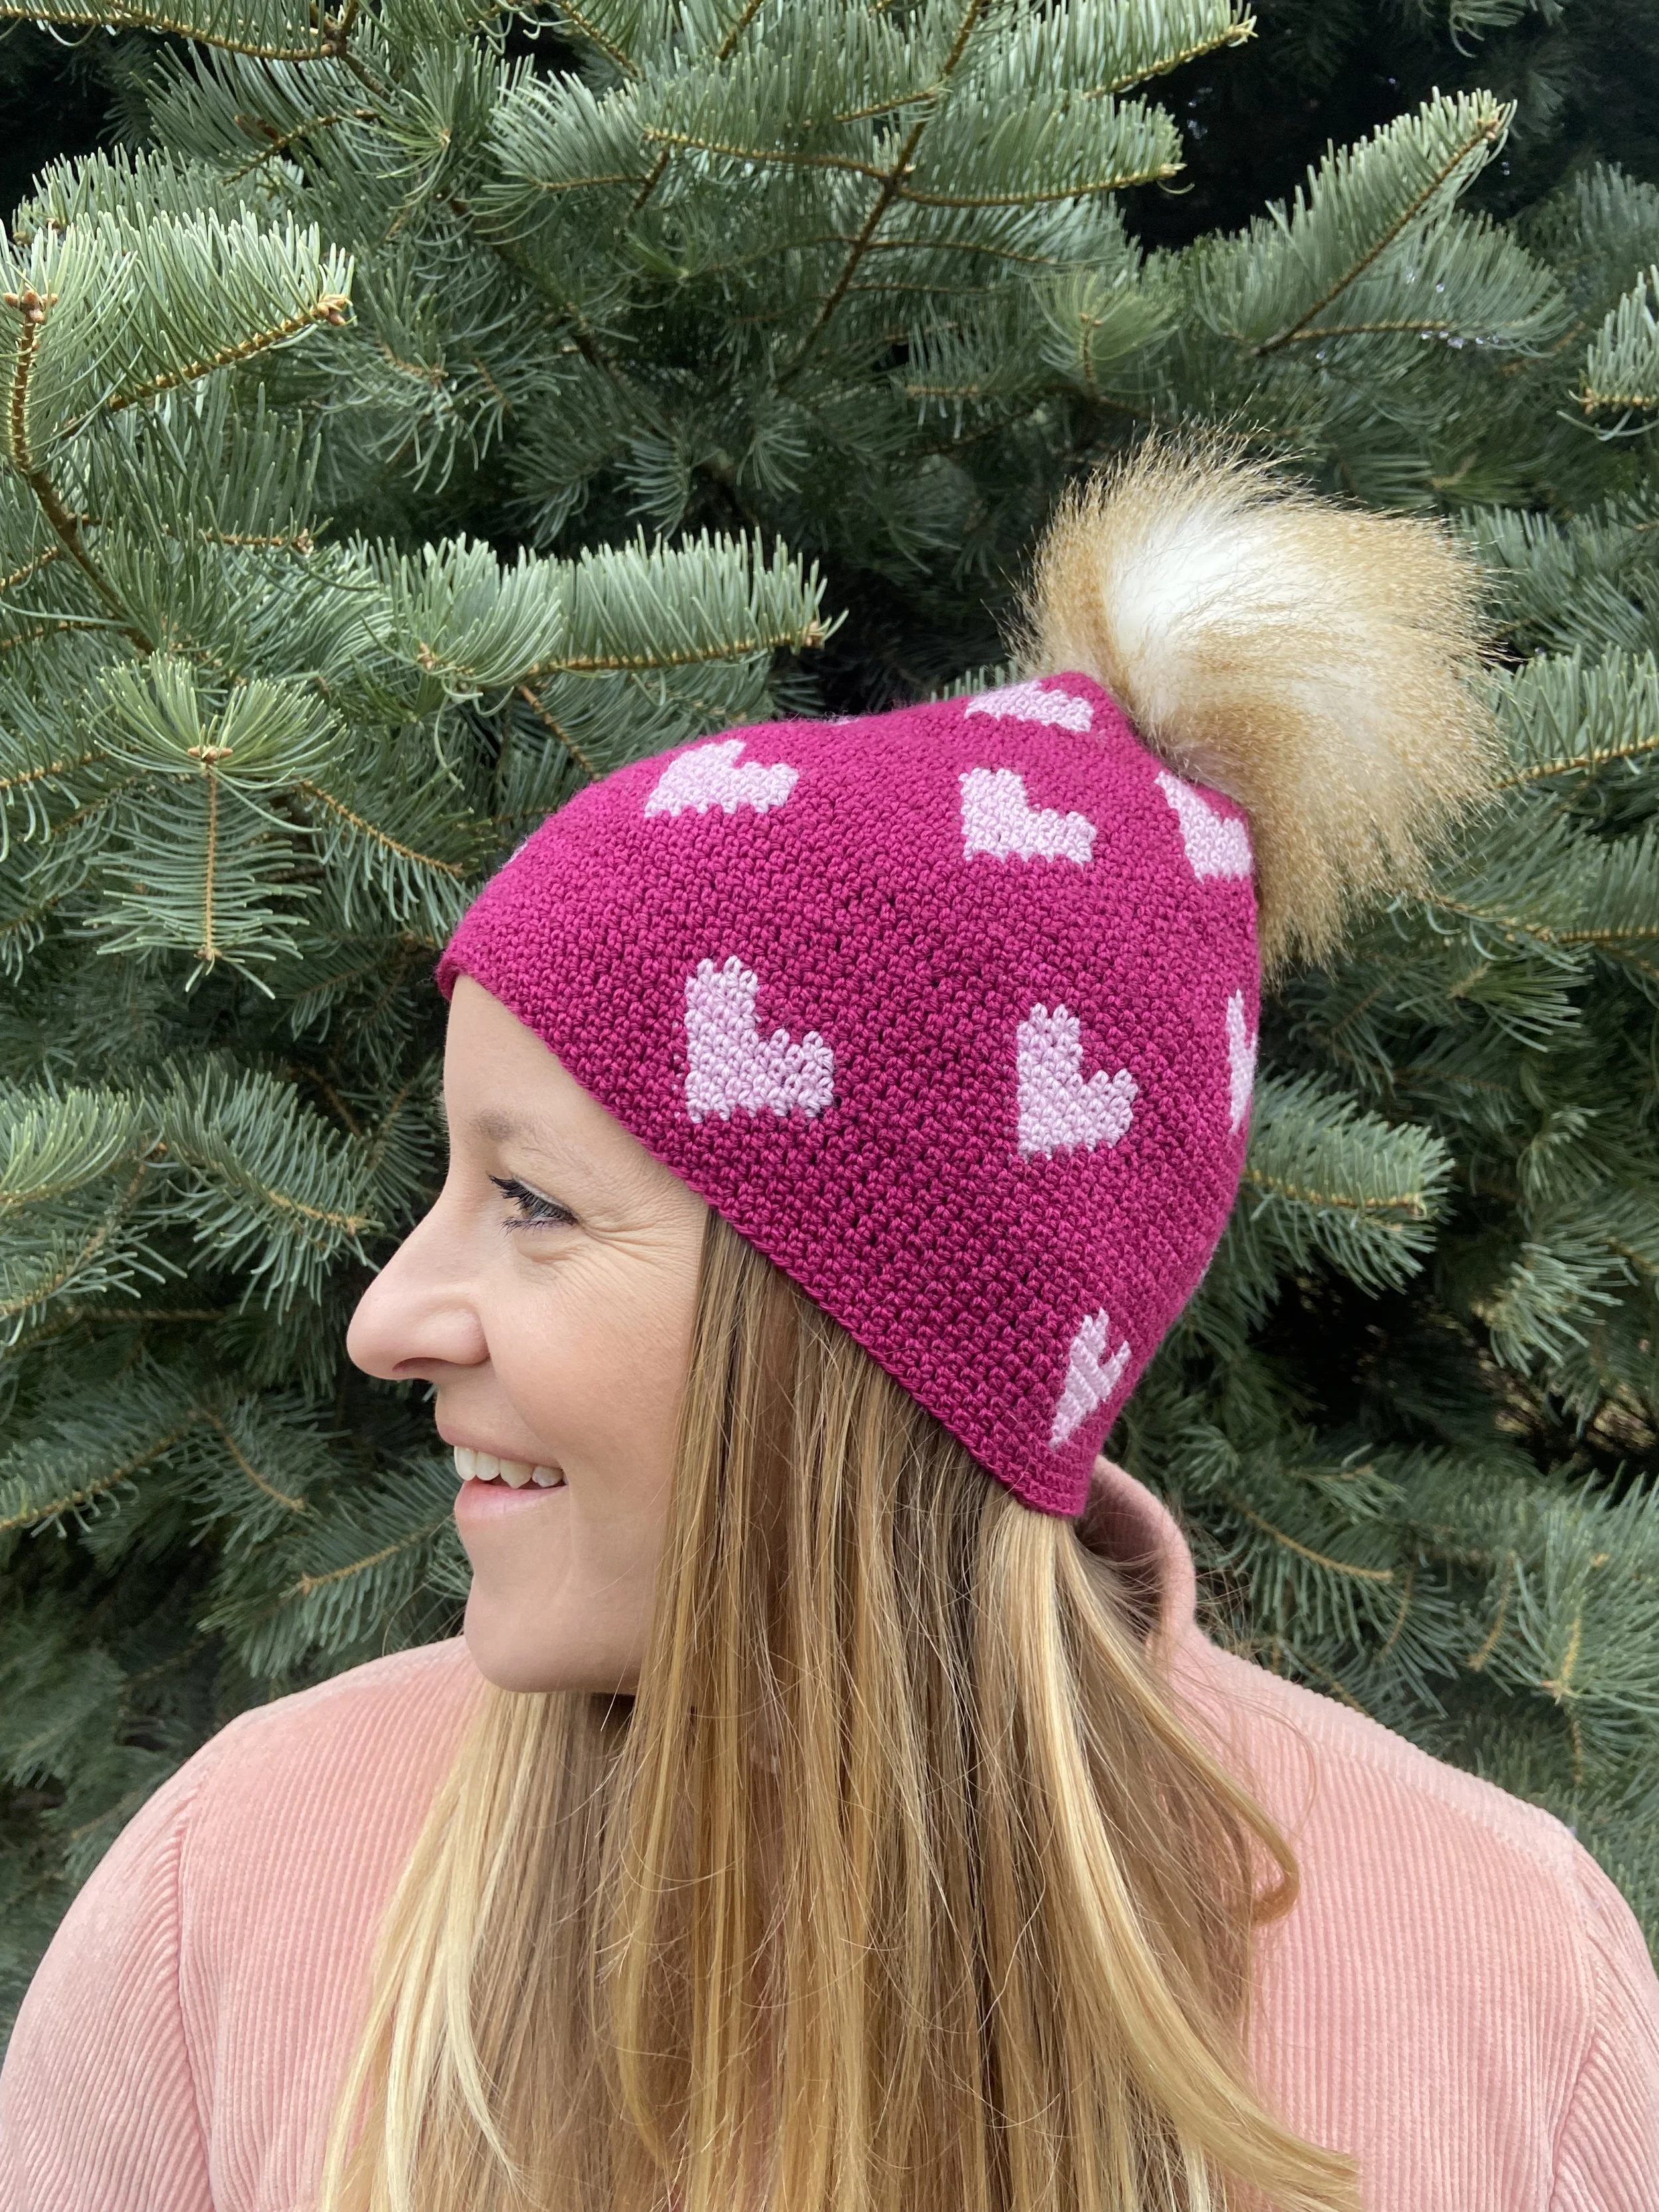
I’m so excited to introduce you to Cordelia - the hat with the cutest colourwork hearts! A perfect Valentine’s Day make, or as something to bring a little fun and whimsy to your everyday outdoor winter wear!
This hat is the perfect first crochet colourwork project for you - it’s lower stakes than an entire sweater, I walk you through how to make it step-by-step and if you’re still getting stuck there’s also a full free video tutorial on my YouTube channel to help you out!
If you’re looking for a smoother, ad-free version of this pattern, it is available in my shop & Ravelry store here:
https://www.ilovetinderbox.com/shop/cordelia-toque
https://www.ravelry.com/patterns/library/cordelia-toque
If you have any questions about this pattern please email me at: courtney@ilovetinderbox.com as comments on this post and DMs on social media may get missed!
Want to know when I release new (& free) patterns? Sign up for my email list here.
This pattern is also available as a free video tutorial over on my YouTube channel, if video is more of a helpful medium for you check it out here.
I used my absolute favourite indie dyer’s yarn to make my Cordelia Toque - The Frosted Stitch. I used their Snowflake Sock base in the colours Rhodolite (MC) and Cherry Blossom (CC). My biggest recommendation when considering colours for your toque is to pick yarns that are high contrast so the hearts really POP!
Not sure what yarn you want to use? My top three rules are that it must fit your budget, you must like the feel of it against your skin and it MUST be the same weight as the pattern - in this case fingering! Want to know everything I suggest when it comes to choosing yarn for crochet wearables? Check out my blog post all about it here.
Alright, let’s get crocheting!
Sizes
Your Head Circumference:
• S 50.8-54.6cm (20-21.5 inches)
• M 55.9-59.7cm (22-23.5 inches)
• L 61-64.8cm (24.-25.5 inches)
Sizes are noted as (S, M, L) throughout the pattern. To choose your size, select the size that corresponds to your head circumference at the place where you would like the brim of the hat to sit. Sample is size medium on a 22 inch/56 cm circumference head.
Materials
• 2.75 mm crochet hook
• Approximately (190, 210, 230) metres or (210, 230, 250) yards of main colour (MC) and 45 metres of contrast colour (CC) in fingering weight yarn, sample made using The Frosted Stitch Snowflake Sock in Rhodolite (MC) and Cherry Blossom (CC), click here to shop
• Optional: 5 hair clips or something to use as bobbins
• Yarn needle, measuring tape, scissors
• Optional: pom pom maker or pre-made pom pom of your choosing
Gauge
• 11 stitches x 11 rounds in a blocked 5 cm (2 inch) square of ESC stitch in the round (not sure how to gauge in the round? No problem - here’s how!)
Legend
2ESC: Work 2 stitches in the same space, increase
CC: Contrast colour
CH(s): Chain(s)
CW: Colourwork
ESC: Extended single crochet
MC: Main colour
R: Round/Row
rep: Repeat
SL ST: Slip stitch
STs: Stitch(es)
WIP: Work in progress
Notes
The CHs at the beginning of each round count as a ST throughout the pattern and should be worked as such in the colour charts.
<Stitch counts> are only listed when they change throughout the pattern!
Round 1
Using MC: Leave yourself a 20 cm (8 inch) tail, CH (29, 35, 41). Join in the round with a SL ST. CH 2, ESC into the back bump of each CH around. Join with a tight SL ST. <(30, 36, 42)>
Round 2
CH 2. ESC 1, 2ESC, *ESC 2, 2ESC*, rep * around. Join with a tight SL ST. <(40, 48, 56)>
Round 3
CH 2. ESC around. Join with a tight SL ST.
Rounds 4 & 5
Rep Round 3 two more times.
Round 6
CH 2. ESC 2, 2ESC, *ESC 3, 2ESC*, rep * around. Join with a tight SL ST. <(50, 60, 70)>
Rounds 7 to 9
Rep Round 3 three more times.
Colourwork Notes
Increases in Colourwork
Whenever you see a “2” in a box in the colourwork chart you are going to work 2 STs in that colour into that ST (an increase).
CC Lengths
Each rep of the CW chart will require it’s own piece of CC yarn. You will need a total of 20 lengths of approximately 210cm (83 inches).
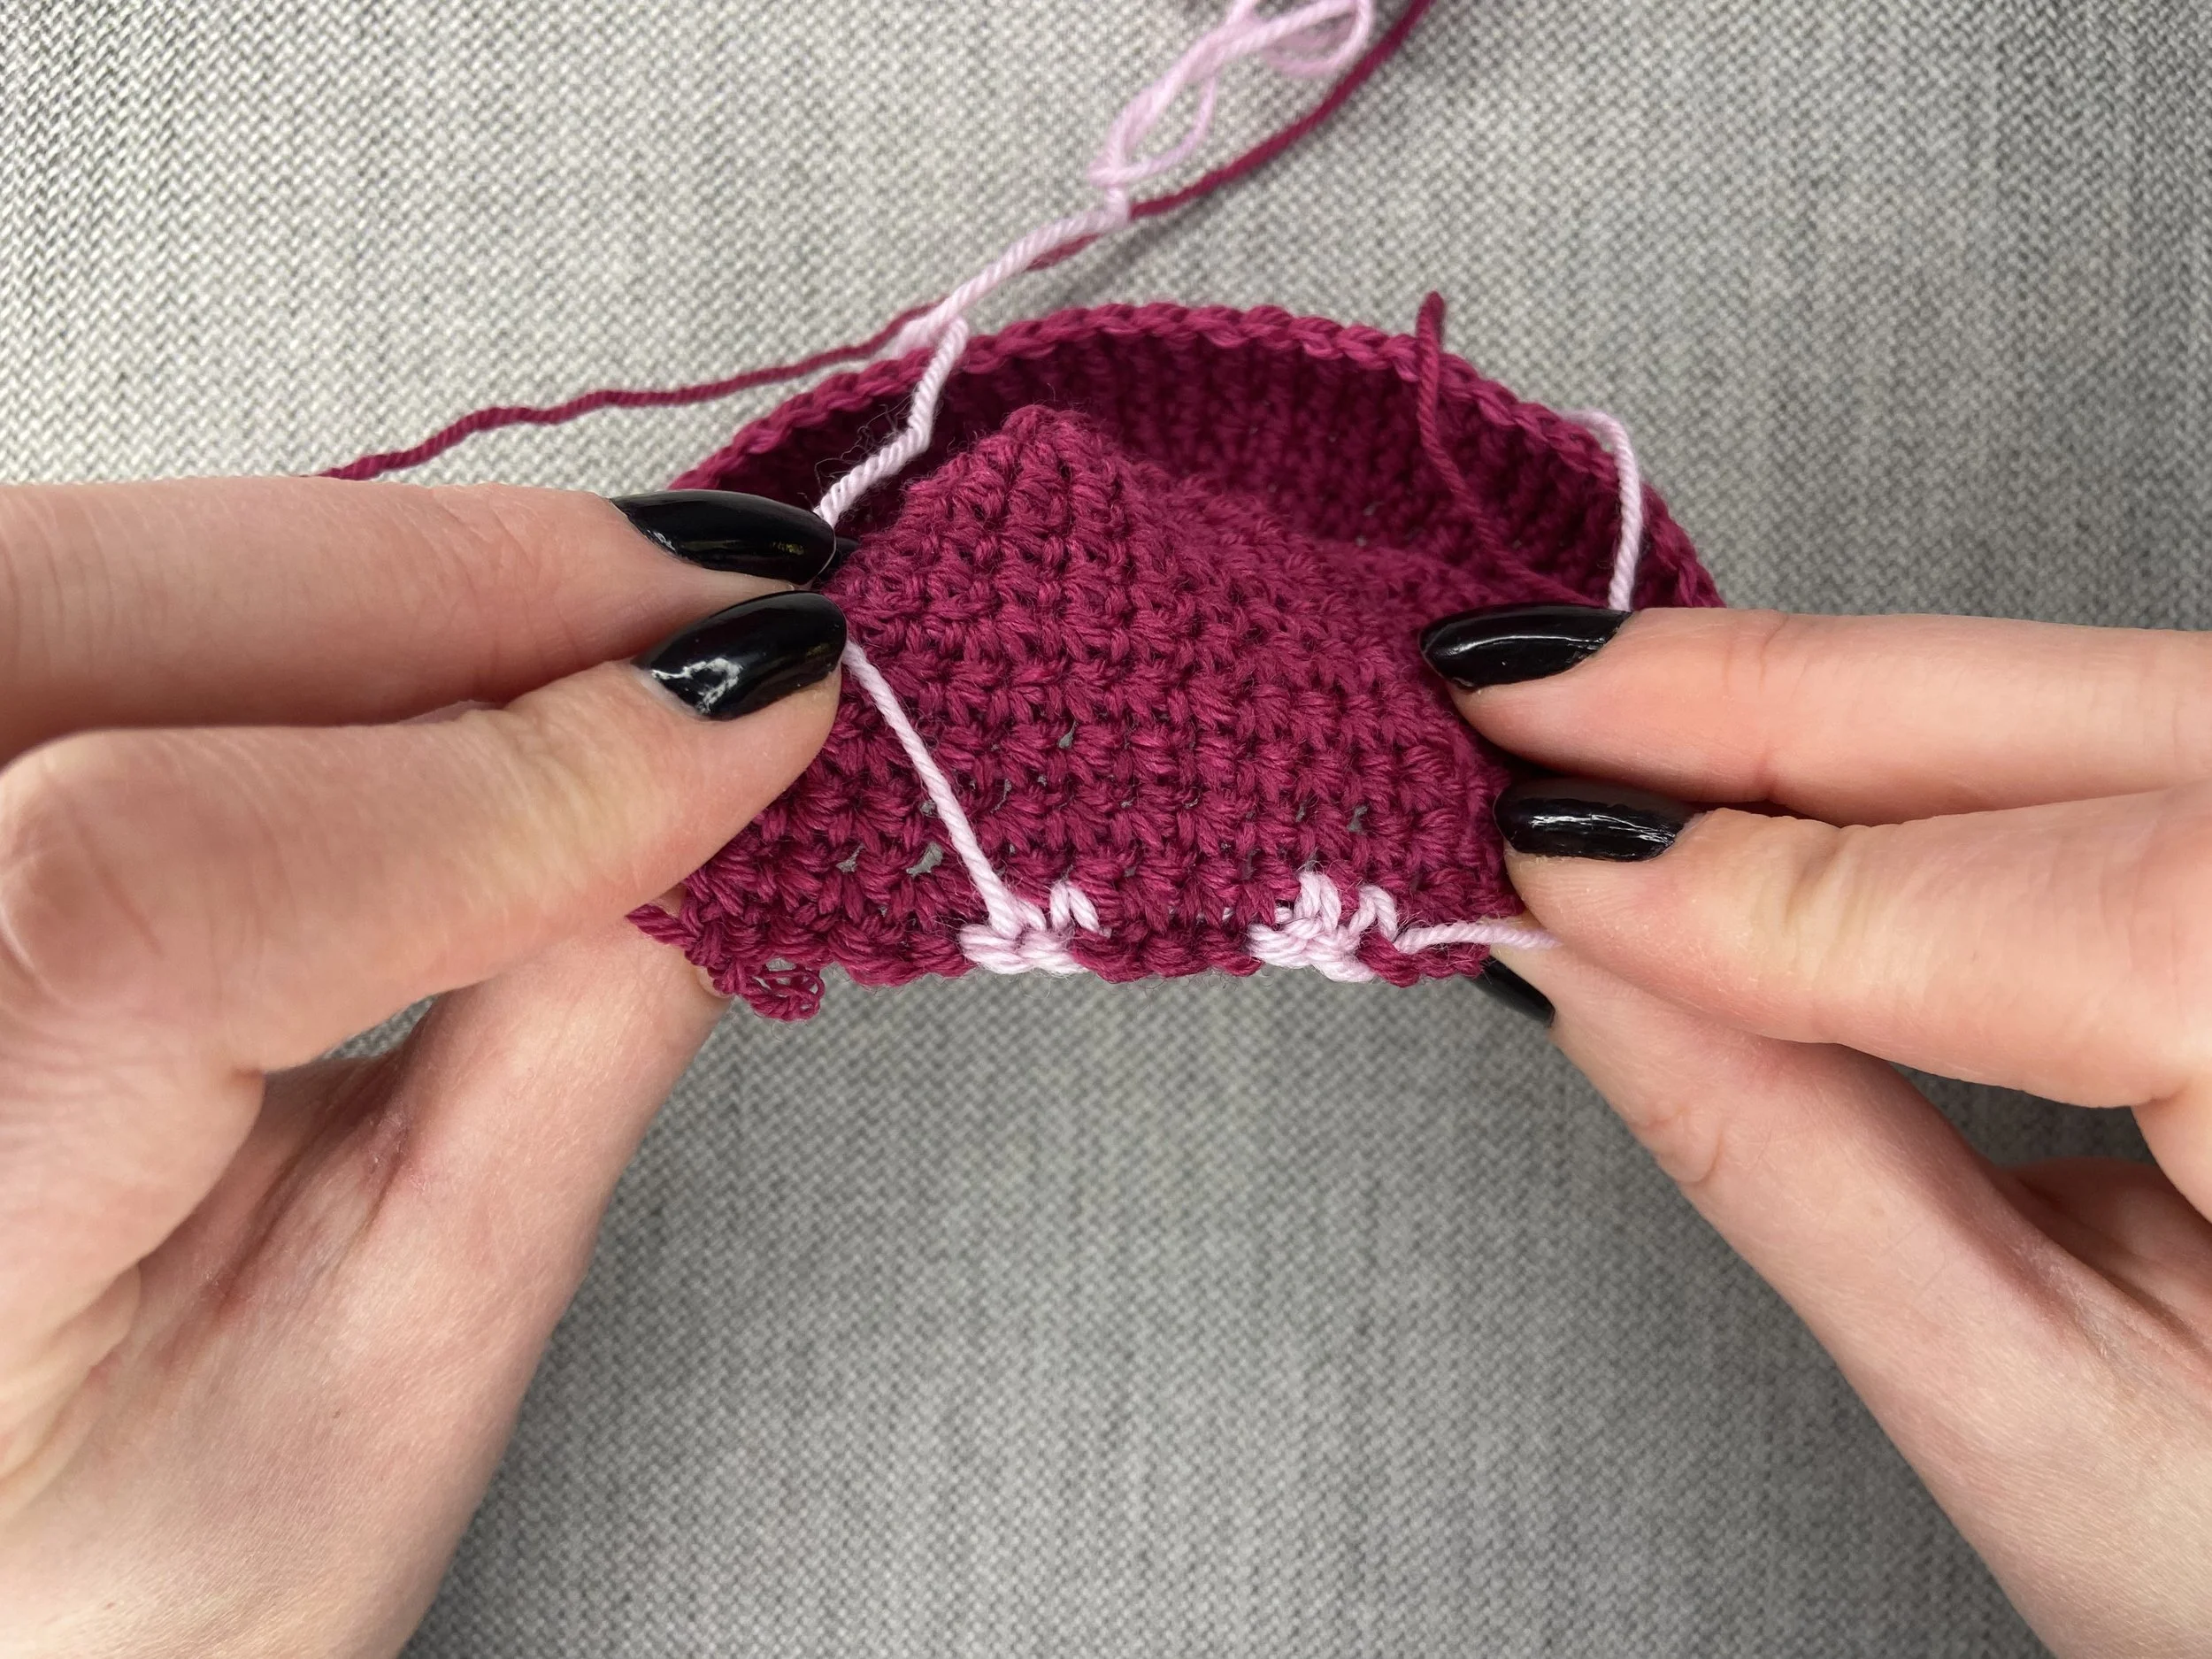
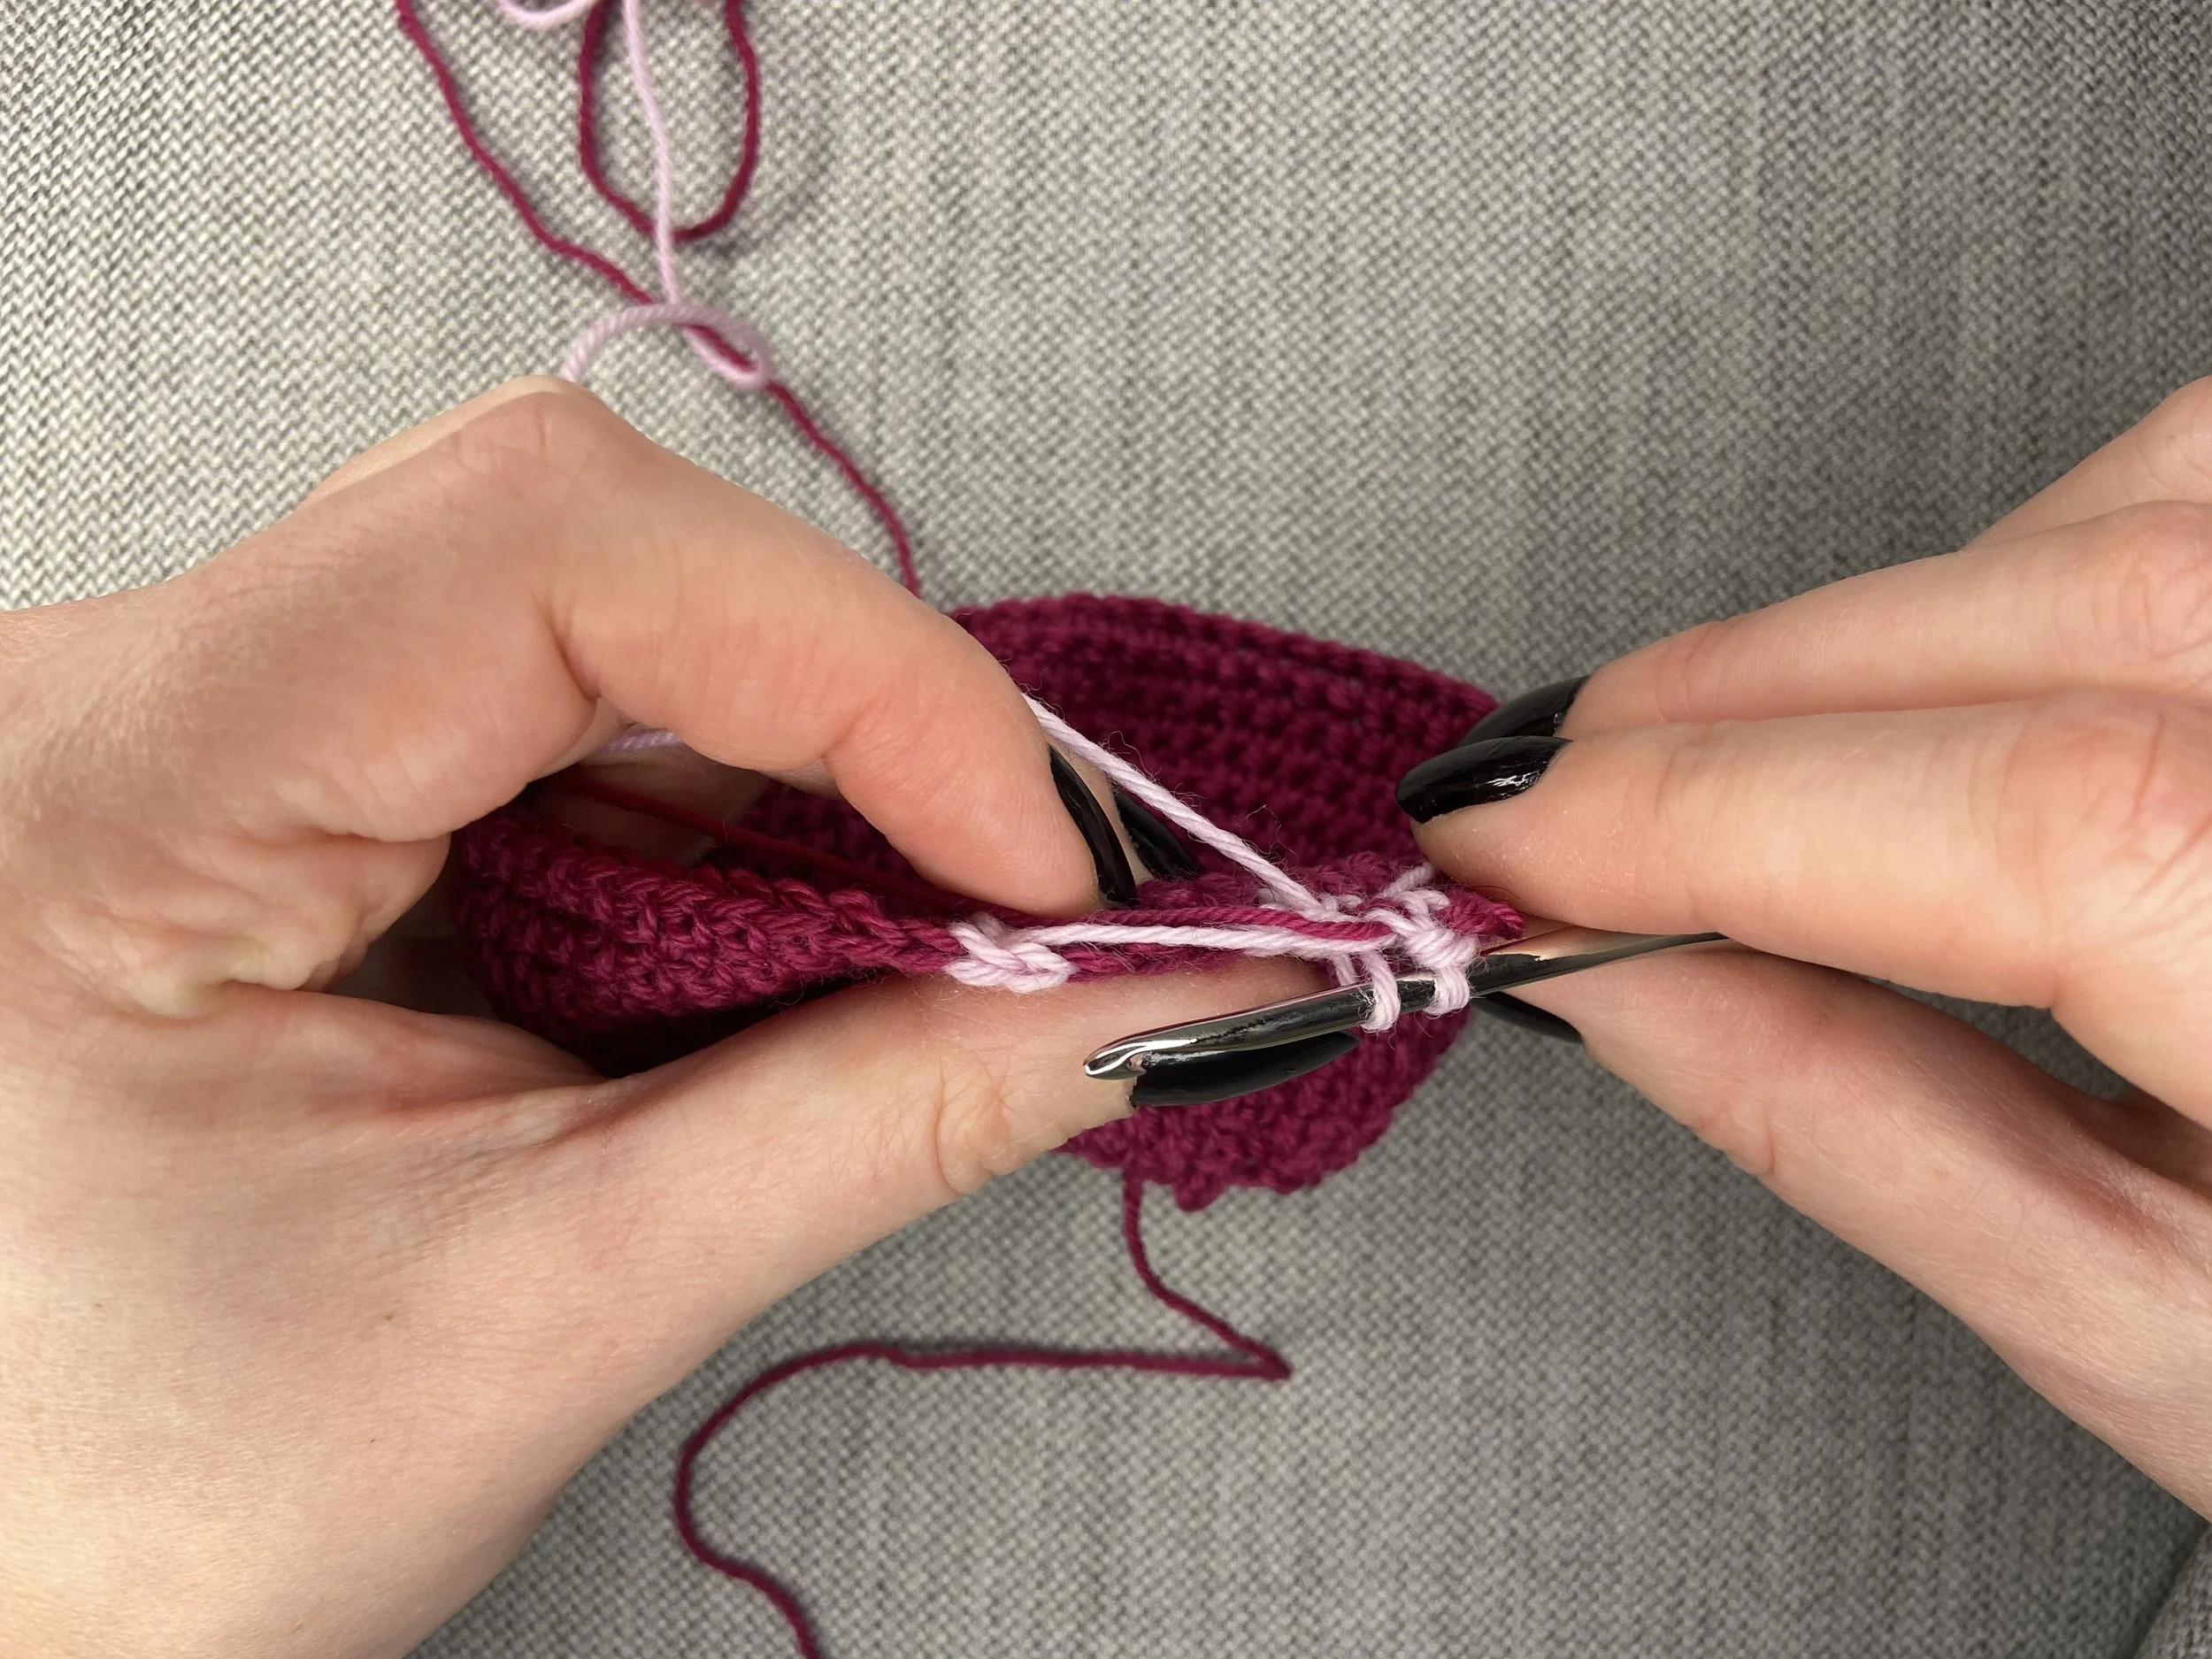
No Floats
Work your stitches over your non-working yarn so that you do not have floats inside of your hat that may catch on hair accessories, earrings etc. (See Images)
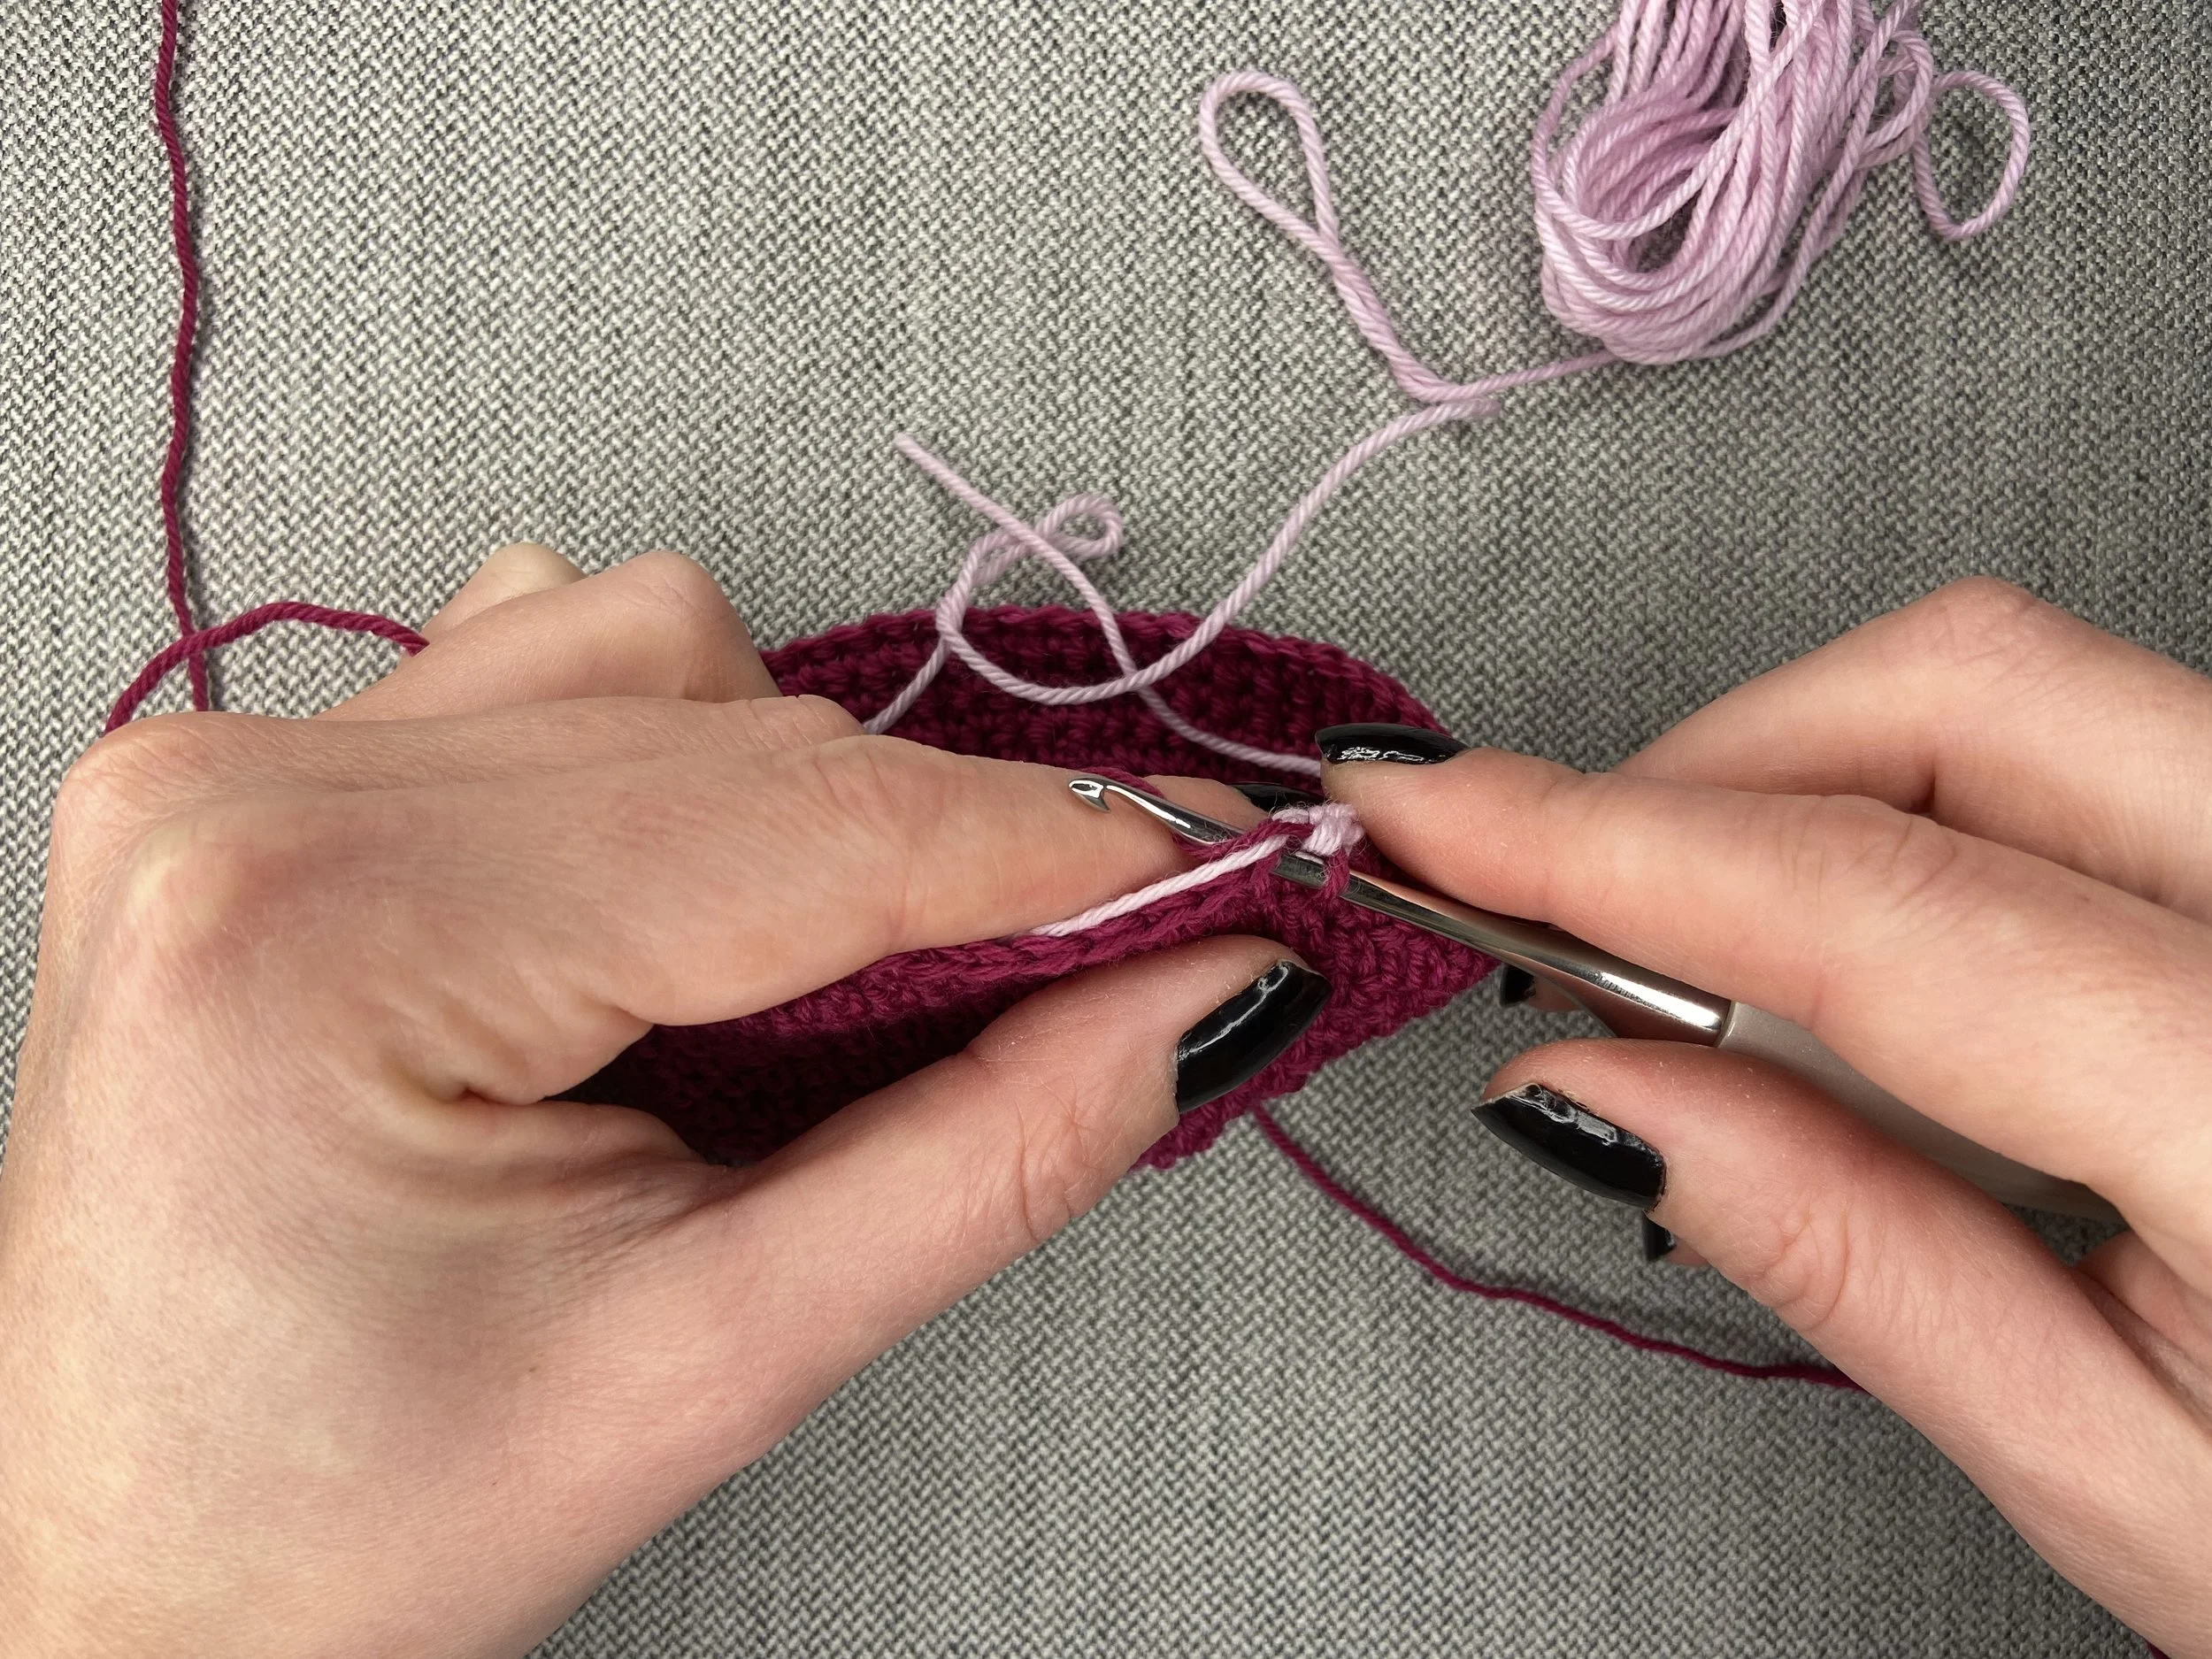
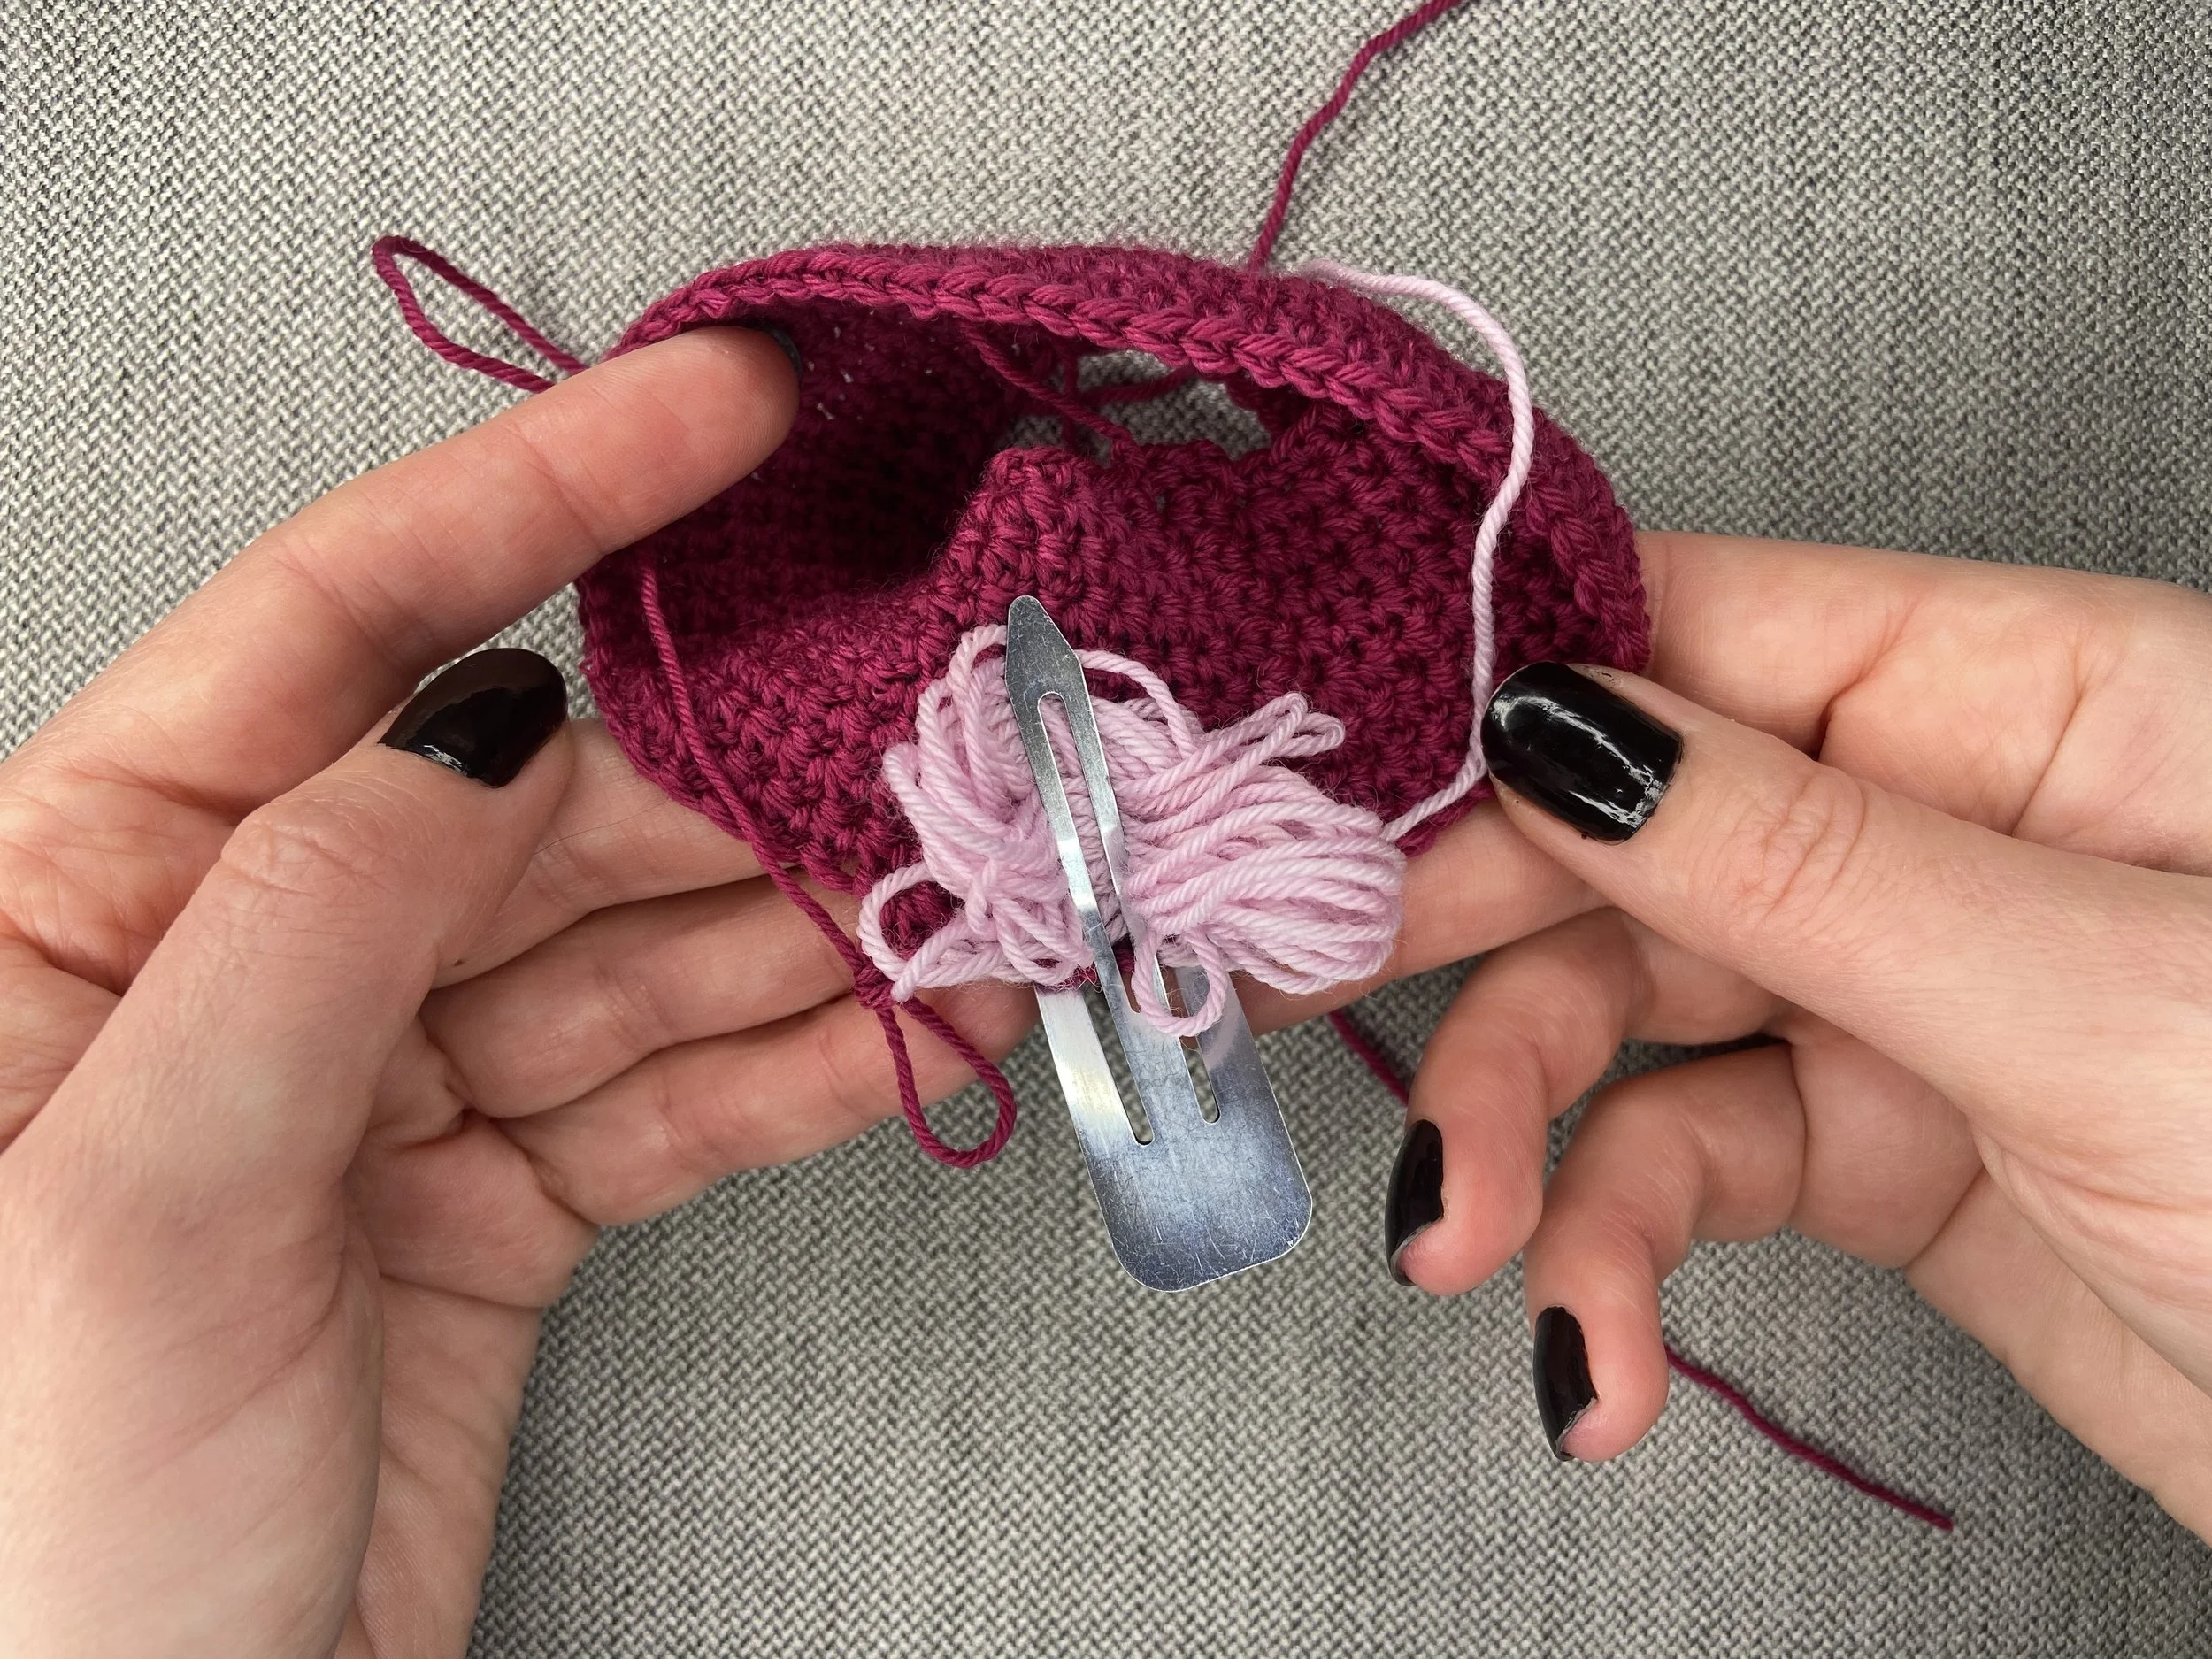
Bobbins/Clips
So that all your loose ends of CC don’t get tangled I recommend using clips or bobby pins to hold each individual length of yarn - I pinned mine directly to my WIP (See Image)
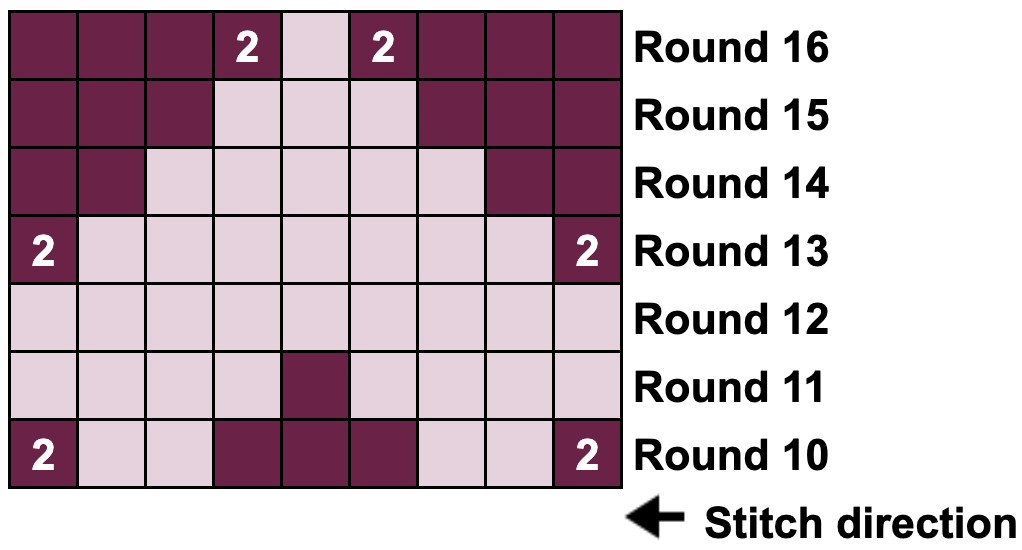
Round 10
CH 2. *Work CW chart (See Image), ESC (1, 3, 5)*, rep * around, you will end one ST short of a full rep. Join with a tight SL ST. <(60, 70, 80)>
Subsequent Rounds
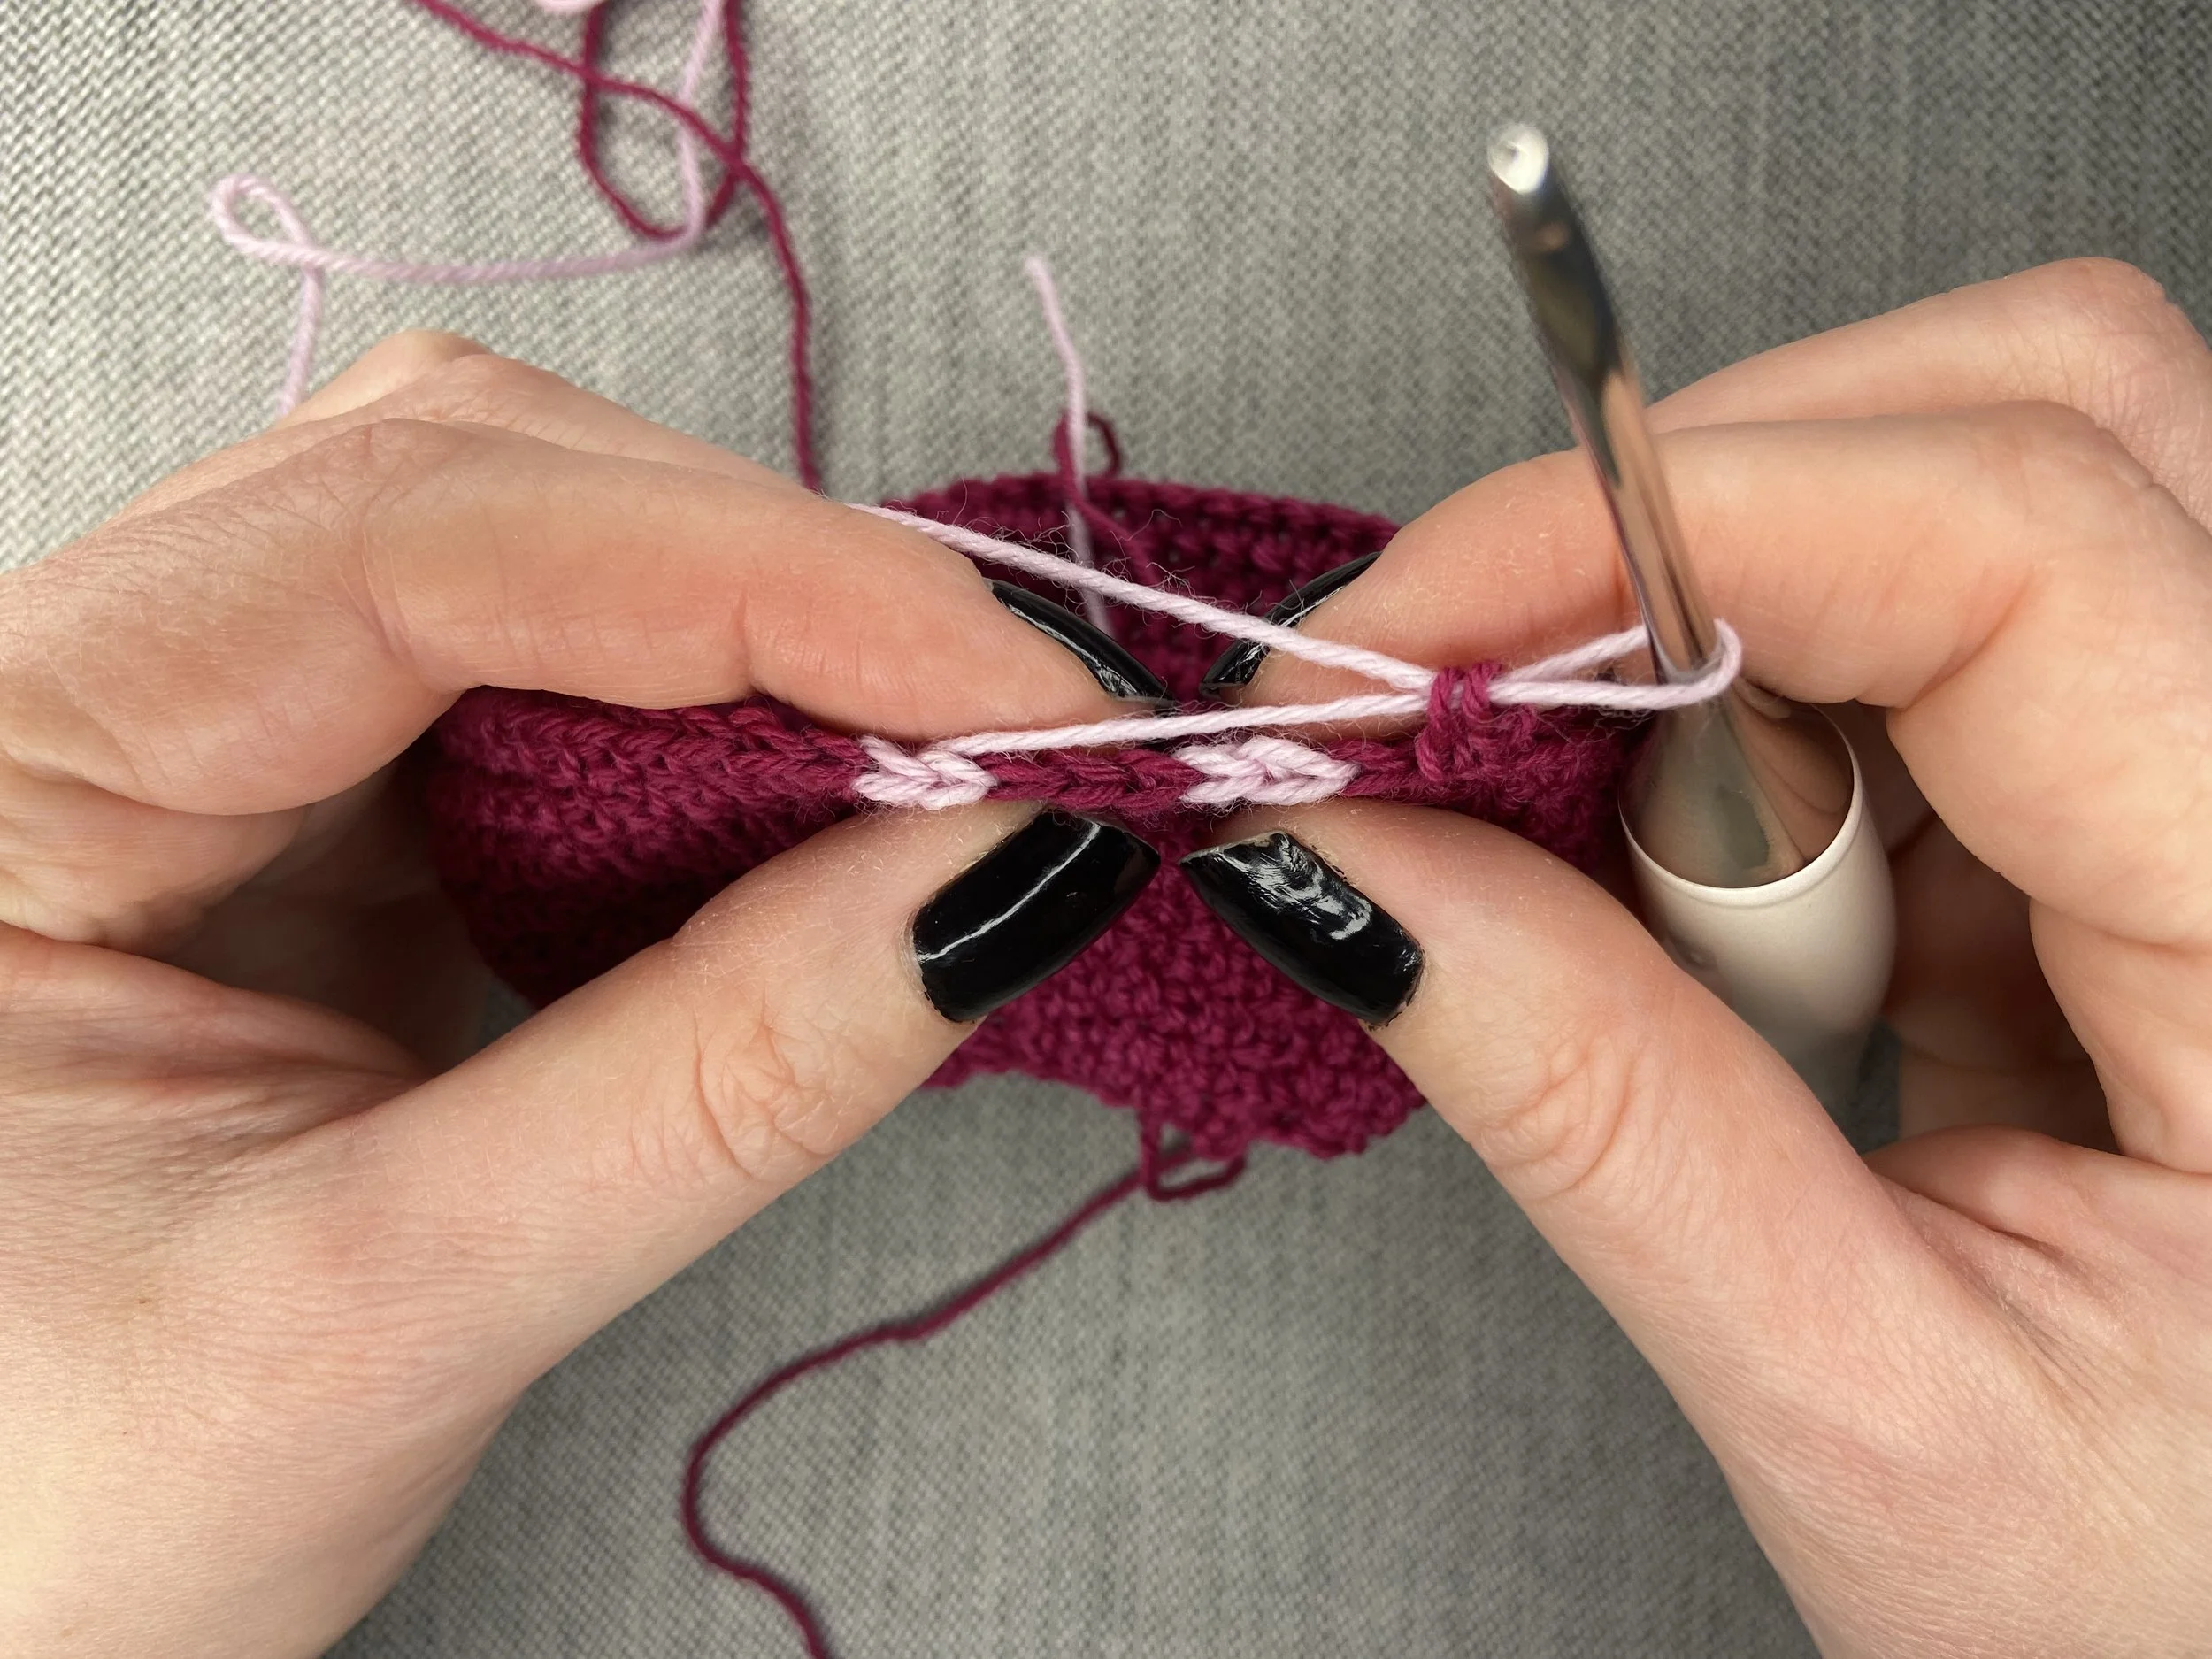
When you begin your CC will be on the opposite side of the hearts - pick up the CC and trail it loosely back to the start of the CW chart, work over that trailing yarn as you work across (See Images)
Heart Spacing
As you continue to work increases your CW will get further apart. Continue working your CW directly above CW from previous rounds, all STs in between remain MC.
Round 11
CH 2. *ESC to CW section, work CW chart*, rep * around. Join with a tight SL ST.
Rounds 12 to 16
Rep Round 11 five more times, working each subsequent row of the CW chart and increasing as necessary. <R13: (70, 80, 90); R16: (80, 90, 100)>
Rounds 17 to (18, 19, 20)
Rep Round 3 (2, 3, 4) more times.
Offsetting Hearts
To offset the 2nd set of hearts you will begin part-way through the CW chart in the next round. Remember the CH 2 counts as one of the blocks in the CW chart.
Round (19, 20, 21)
Begin in the (5th, 6th, 7th) box in the CW chart (See Image). CH 2, work remaining CW STs, *ESC (7, 9, 11), work CW chart*, rep * around, ends mid rep. Join with a tight SL ST. <(90, 100, 110)>
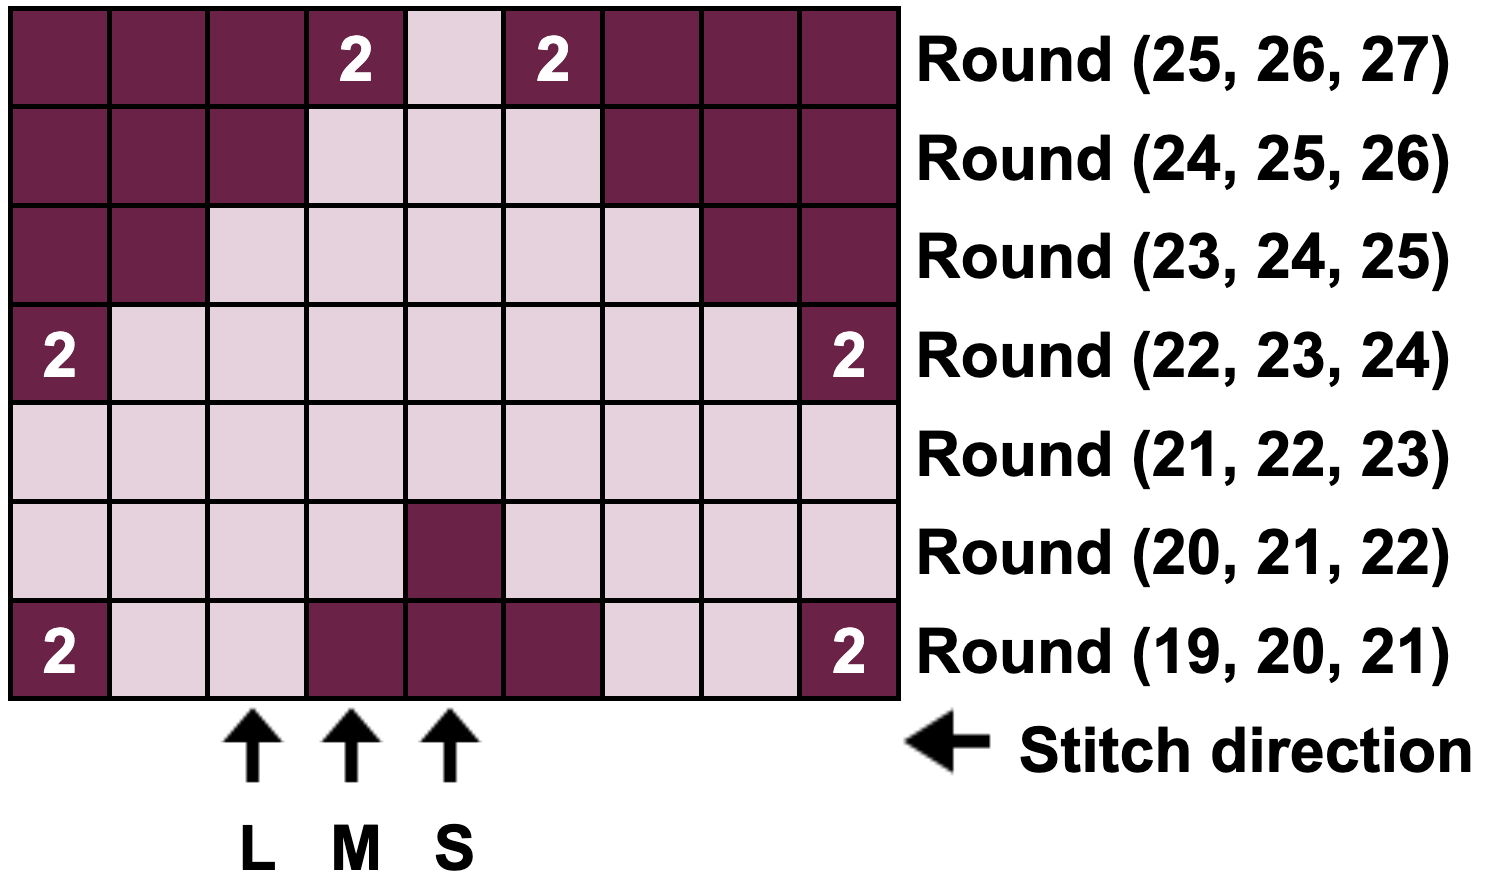
Checking Placement
Your second set of hearts should be perfectly centred between the first set of hearts. If you’re off by a stitch or two, that’s okay - just adjust where you start the CW chart accordingly!
Round (20, 21, 22)
CH 2. *Work CW chart, ESC to CW section*, rep * around, ends mid rep. Join with a tight SL ST.
To Round (25, 26, 27)
Rep Round (20, 21, 22) five more times, working each subsequent row of the CW chart and increasing as necessary. <R(22, 23, 24): (100, 110, 120); R(23, 24, 25): (110, 120, 130)>
To Round (27, 29, 31)
Rep Round 3 (2, 3, 4) more times.
Increases Complete
Congrats! All the increases are now complete! You will work two more sets of hearts, but now you won’t do any increasing while working the CW chart!
Round (28, 30, 32)
CH 2. ESC (6, 6, 5), *work CW chart (See Image), ESC (13, 15, 17)*, rep * around, ends mid rep. Join with a tight SL ST.

Round (29, 31, 33)
CH 2. *ESC to CW section, work CW chart*, rep * around, ends mid rep. Join with a tight SL ST.
To Round (34, 36, 38)
Rep Round (29, 31, 33) five more times, working each subsequent row of the CW chart.
To Round (36, 39, 42)
Rep Round 3 (2, 3, 4) more times.
Round (37, 40, 43)
Begin in the (5th, 6th, 8th) box in the CW chart. CH 2, work remaining CW STs, *ESC (13, 15, 17), work CW chart*, rep * around, ends mid rep. Join with a tight SL ST.

Round (38, 41, 44)
CH 2. *Work CW chart, ESC to CW section*, rep * around, ends mid rep. Join with a tight SL ST.
To Round (45, 49, 53)
Rep Round 3 (2, 3, 4) more times. Fasten off, weave in ends.
Finishing Touches
Using a darning needle weave the long tail at the start of your hat around the top of the hat and pull it tight to close.
Pom Pom
Attach a pom pom to the top of your hat! Want to know how to make your own pom pom? Check out my tutorial here.
Blocking
Block your hat for optimum comfort and fit!
Thank you so much for making the Cordelia Toque! Tag me @ilovetinderbox on your favourite social media platform (I’m on almost all of them!) so I can see your finished product. If you have any questions please email me courtney@ilovetinderbox.com
Happy crocheting,
Courtney